Test Data
Press the New Test button to start a new run. The Test Data form will open.
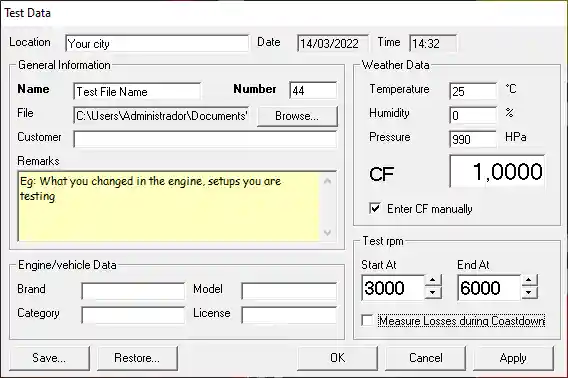
Main Test Data
-
Name:name of the test. This will be used together with the test number to identify the file on disk that will store the test information and the data obtained in the test. -
Number:test number. Each test consists of a name and a number. The number will automatically increase on each test. -
File:by pressing theBrowsebutton you can change the folder where the test will be saved. This will allow you to organize tests carried out in folders and subfolders. -
Remarks:here you can enter the changes you are making to the engine or vehicle so that when you open the test you know the conditions in which it was carried out. It can also be completed after making the run. -
Temperature, Humidity and Pressure:the current weather data. If you have the atmospheric central module, this data will be loaded automatically.
CORRECTION STANDARD
The correction standard can be changed in Options. By default the SAE 1349 standard is used.
The standard values of the SAE 1349 standard are 25ºC for temperature, 990 hPa for absolute barometric pressure and 0% for ambient humidity. These values will give a FC = 1.0.
DATA OUT OF RANGE
If the Climate Correction Factor (CF) or some of the climate data appears in red, it means that the values are out of range. Verify that the values have been loaded correctly otherwise the corrected power will result in incorrect values.
TURBO VEHICLES
In vehicles with turbo compressor, the climatic correction formulas do not apply since the engine is more sensitive to boost pressure than to atmospheric pressure. While there is an influence of weather on power, that influence is not predictable by any official standard.
In case of testing turbocharged vehicles we recommend deactivating the climate correction by clicking on Load FC manually and writing the FC 1.0 to cancel it. Failure to do so may result in the corrected power indicated by the system being excessively high, especially in cities that are higher above sea level.
Start RPM and End RPM:the two RPM values between which you are interested in obtaining test data. Any sample that is outside of this range will not be stored.
RPM RANGE
If you are not sure what the correct range is, enter a wide range, you can always use the acquisition pushbutton to start or stop the test manually.
-
Measure Losses during Coastdown:activate this check mark to automatically carry out the loss test after the power run. If this option is not activated, the run will end automatically when reaching the maximum RPM without making the loss measurement. See here how to make coastdown dyno runs. -
OKto start testing.